Nik Collection is a set of image editing and enhancement tools developed as a plugin for Adobe Photoshop, Adobe Lightroom, and Aperture.
It comprises of Analog Efex Pro, Color Efex Pro, Dfine, HDR Efex Pro, Sharpener Pro, Silver Efex Pro, Viveza and Snapseed as it’s prime features. The combination of these tools can be used to enhance the look of any digital image for completely free of cost. Just like its base software – Photoshop, it retains Cache Files to speed up the overall software performance, assist when the program crashes, log the progress of its installation for review purpose etc. This guide demonstrates how to clean up these cache files to regain the wasted space back to the system with ease.
Cleaning up junk data from the system or a software program (Nik Collection in this case) is a fairly straightforward ask as far as an efficient junk cleaning software is concerned. Use a reputable software like ST Cleaner, and forget about any junk absolutely.
Sweep Clean Nik Collection Junk
ST Cleaner is a digitally signed, verified software
Solutions
Solution 1: Clean the Crash Reports
Crash Reports contain certain information pertaining to the occurred bug, assist in debugging the problem that the user has encountered without making developers get into the system where the program is installed. If the program has crashed several times, it’s better to clean up the Crash Reports in order to gain the wasted space back and keep the file system clean and tidy.
- Open up Windows Explorer / File Explorer.
- Type the following local address in the Address Bar:
%userprofile%\Local\Google

- Locate the Search Box, (situated next to the Address Bar). Type _Log in it and press Enter to start searching files.
- When the search result shows up with the filtered files, delete them altogether by using Ctrl + A (Select All) and Shift + Delete (Delete permanently).
Solution 2: Delete the Installer Logs
Installer Logs assist in reviewing the progress of the installation and are considered standard log files for installing any program. Nik Collection stores a couple of log files during installation, and this solution demonstrates how to get rid of them from the file system.
- Open Windows Explorer / File Explorer.
- Type the following address in the Address Bar:
%userprofile%\Local\Google

- Locate the Nik Collection Installer Logs folder.

- Delete it permanently by pressing the Shift + Del keys simultaneously, and pressing Enter to confirm the action.
Solution 3: Delete the Temporary Files Along with Cache
As stated earlier, Cache Files are spawned and utilized to enhance the performance of the software when it is being used. However, when these files continue to pile up for a while without being swept, they can swiftly eat through the free space on the hard disk. This brings us yet again to the need to periodically clean up these temporary files once in a while.
- Launch the Windows Explorer (Windows 8 and previous versions) / File Explorer (Windows 10).
- Type the following local address in the Address Bar and press Enter to open it:
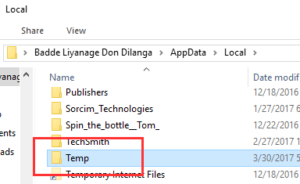
%userprofile%\AppData\Local

- Now Delete the Temp folder from the system. Make sure all the programs are closed prior to deletion, as an active program might be accessing some files from this folder and those files won’t be deleted until they become inactive.


