Sky Fibre is a superfast Internet Service Provider (ISP) with an amazing 36MBs being the lowest speed it offers. It works great and people have praised it all the same. But sometimes Sky Fibre becomes too slow, especially on Windows 10. In this article, you can learn how you can speed up Sky Fibre Internet in Windows 10 with these simple tweaks.
Use ST Cleaner to clean up the web junk on your computer system, which will, in turn, have a highly positive impact on your browsing experience. The whole procedure is absolutely safe and straightforward.
ST Cleaner adheres to Clean Software Association Guidelines
What’s Your Internet Speed?
First of all, find out what your Internet speed is. Visit speedtest.net and check your internet speed. If it is not close to what you are paying for, then before lodging a complaint, perform the following tweaks to make sure that the low speed isn’t due to a problem at your end.
Uninstall and Reinstall Wi-Fi Driver
First of all, uninstall and reinstall the Wi-Fi drivers of your system. There is a chance that they have become corrupt.
Simply go to the Device Manager, collapse Network adapters and then select the Wi-Fi Driver. Double-click it and select Uninstall Device from the Driver tab. Next, click the Scan for hardware changes button and to automatically install the latest driver for your Wi-Fi device.

Scan Wi-Fi Speed
Scan the Wi-Fi strength.
On your desktop computer, select LizardSystems Wi-Fi Scanner to check the range and strength of the signals of your Wi-Fi device. The software is available for a free trial of 10 days and you can easily download it here.

Ensure More than 90% Signal Strength
On Android, use the Wifi Analyzer app to check for Wi-Fi signal strength. It will find all Wi-Fi hotspots in your area in a graphical format while providing signal strength.
Check for Background Programs/ Services
Are there any running any background services running in the background that are eating up network speed? Simply check this through the Task Manager.
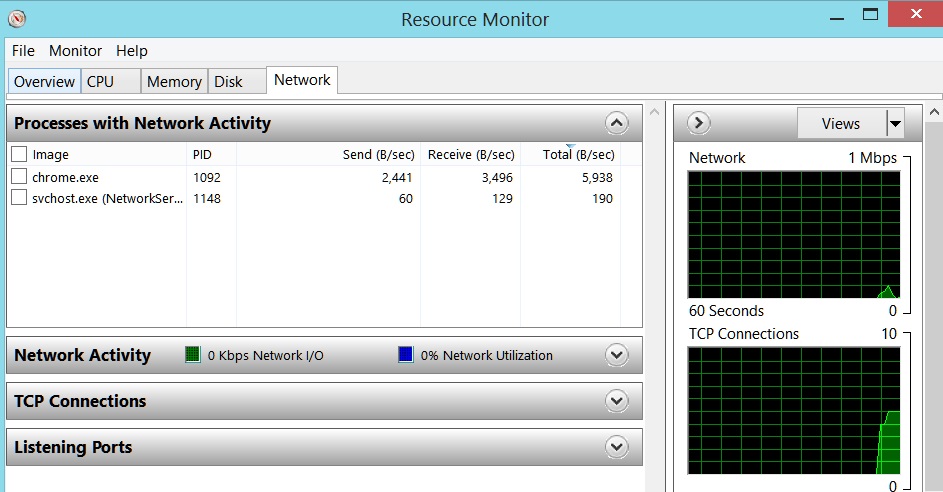
Press Ctrl + Shift + Esc to launch the Task Manager. Click Performance | Open Resource Monitor | Network.
You will see a list of process that are currently consuming the network speed.

Just turn off any process that is unwanted by right-clicking it and selecting End Process.

Turn Off Services to Boost Speed
Some services that are running in the background include Stream gaming service, Torrent, Antivirus services, Internet security services and cloud sharing apps. Combined together, they are consuming a lot of bandwidth. Therefore, it is always a wise choice to disable all of them.
You can disable them from auto starting as well. Simply press Windows Key + R and then type msconfig in the Run console window that just opened. Press Enter to launch the System Configuration window. Select all the programs similar to the ones we have identified above and uncheck the box next to them. This will hopefully help your network unclog a little.
Turn off Background Apps
Click Start | Settings. Next, click on Privacy, scroll down and select Background apps from the left pane. You can now turn off all apps and services that are consuming your Internet bandwidth for no good.

Disable Windows Automatic Updates
Open Control Panel and then head over to Administrative Tools. Select Services and then scroll down to Windows Update. Right-click it and select Properties. Now simply select Disabled in the Startup type drop-down menu. Click OK to save the changes and exit.

Note: It is advisable to check for new updates once every month. So, to download the latest updates, simply turn it on and scan for the latest updates.
Disable Large Send Offload V2 (IPv4)
Large Send Offload V2 is a feature of Windows 10, which is available on both IPv4 and IPv6 connections. This saves the server from segmentation and helps avoid traffic congestion. But it can also slow Internet speed because the PC will wait until the exact amount of info is available for sending.
Many users have reported that disabling the Large Send Offload V2 feature can increase system speed to some extent.
Open up the Device Manager. Right-click the Network Card and select Properties. Select Large Send Offload V2 (IPv4) and select Disabled from the Value drop-down menu. Do the exact same for Large Send Offload V2 (IPv6) and then click OK to save the changes.
